Master UV Unwrapping and Texturing in Blender: The Ultimate Guide
by Theodore Egling | March 31, 2023
Embark on a thrilling journey into the world of 3D modeling and texturing, as we uncover the secrets of UV unwrapping and its importance in creating stunning textures.
What is UV Unwrapping and Why is it Crucial?
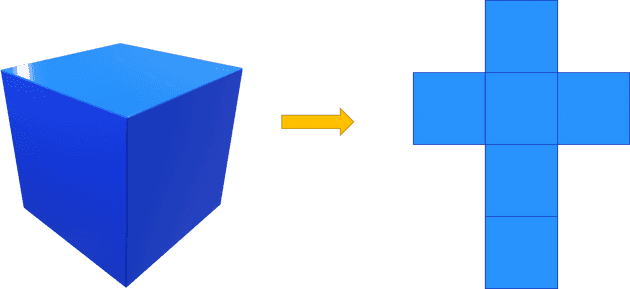
UV unwrapping is the magical process of taking a 3D model's mesh and transforming it into a 2D layout. This essential step allows textures, which are 2D images themselves, to be seamlessly applied to your 3D mesh.
Why not just apply textures directly to a 3D mesh, you ask? The answer lies in the fundamental difference between a 2D image and a 3D mesh. To bridge this gap, we first need to unwrap the mesh into 2D space.
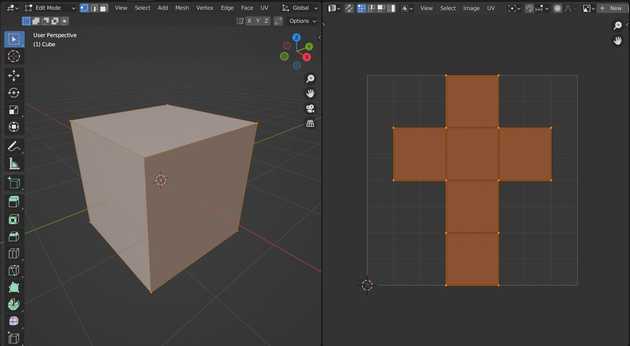
Once a mesh is unwrapped, the mystical UV map comes into play. This 2D image serves as a guide, showing how the 3D mesh transforms into a 2D layout. UV maps are usually square images with the unwrapped mesh neatly laid out within its borders.
Mastering the Art of UV Unwrapping in Blender
Now that we've grasped the essence of UV unwrapping, let's dive into the practical side of things by exploring how to unwrap your mesh in Blender.
- Select your mesh: In the 3D Viewport, press
Ato highlight all vertices. Then, switch to the UV/Image Editor and pressAagain to select all faces. - Unwrap your mesh: Head over to the UV/Image Editor and press
Uto access the UV Unwrap menu. Choose your desired unwrapping method— for this tutorial, we'll use the versatileUnwrapmethod. - Manipulate faces: After unwrapping, you can move and rotate individual faces for a perfect fit within the UV map. Press
Gto grab a face and use the mouse to maneuver it. To rotate a face, pressR.
Texturing After UV Unwrapping
With your model unwrapped, it's time to apply textures to breathe life into your creation.
-
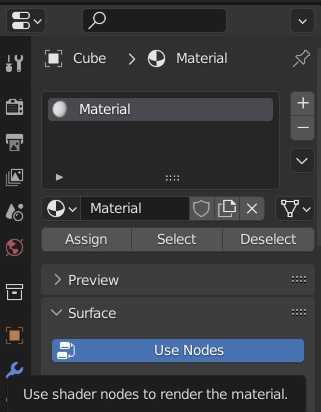
Assign materials: In the Material Properties tab, create a new material and assign it to your object. In the below example, a material called "Material" was added to the cube.
-
Add a texture: Navigate to the Shader Editor and add an
Image Texturenode. Connect the node'sColoroutput to theBase Colorinput of thePrincipled BSDFshader.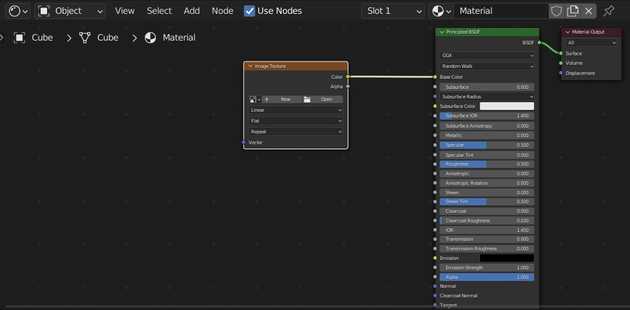
-
Load your texture: In the
Image Texturenode, clickOpenand select the texture you want to apply.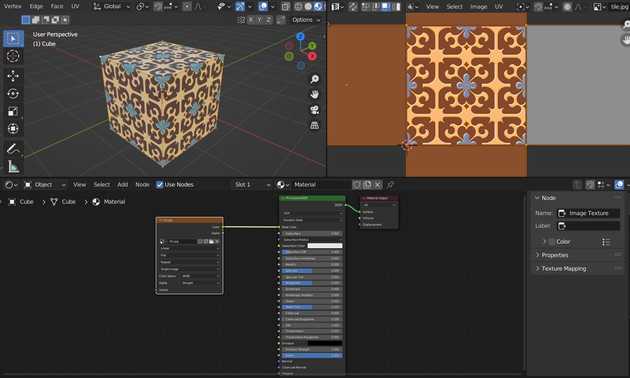
-
Adjust settings: Fine-tune your texture by adjusting parameters such as scale, rotation, and mapping coordinates in the Shader Editor. In the above example, the tile pattern was scaled up so that the pattern would be seamless along the cube's edges.
Baking: The Secret Ingredient to Texturing Perfection
Baking is a powerful technique that involves generating a 2D texture from your 3D model's existing materials, textures, or other surface properties. It's particularly useful when you need to optimize your model for real-time rendering (e.g., in video games or on websites), or when you want to transfer surface details from a high-poly mesh to a low-poly version.
When to Use Baking
Here are a few scenarios when baking is essential:
- Performance optimization: Baking can help reduce computational overhead by generating simpler textures that can be applied to low-poly models.
- Texture atlas creation: By baking, you can combine multiple textures into a single texture atlas, simplifying the texturing process and reducing the number of draw calls in a game engine.
- Normal map generation: Baking can be used to capture the surface details of a high-poly model and generate a normal map, which can then be applied to a low-poly model to enhance its appearance.
Why Baking is Important
Baking is crucial for various reasons:
- Efficiency: Baked textures require less computational power to render, making them ideal for real-time applications such as video games or interactive scenes.
- Consistency: Baking allows you to maintain consistent shading, lighting, and material properties across different platforms or rendering engines.
- Detail preservation: Baking enables you to transfer intricate details from high-poly models to low-poly counterparts without compromising visual quality.
Conclusion
Mastering UV unwrapping and texturing in Blender is an essential skill for any 3D artist. This comprehensive guide has provided you with the knowledge to unwrap your 3D models, apply textures, and harness the power of baking to create stunning visuals. With practice and perseverance, you'll be well on your way to producing captivating 3D art.
Recent Articles
- Blender vs. Maya: Exploring - the Titans of 3D Software
- Mastering the Art of 3D Video Production: From Concept to Captivation
- Are you an artificial intelligence cub or lion?
- Enhancing Customer Service in Manufacturing: The QR Code Advantage
- Unlocking the Depth of Web Design: Embracing the Power of 3D
